Connections
Connection is the link between the Launcher and the Secret. It acts as a shortcut or shortcut that allows the Launcher to run using the data stored in the Secret - connections itself doesn't save any users data. A Connection can be shared with other users or groups of users. Permissions to access the Connection can be set in the desired range. Stored Connections are displayed in the folders structures. Every user has own personal folder.
For related privileges see Privileges and Permissions chapter.
Available actions in the list of Connections: |
|
|
Create new Connection |
|
|
[ button on the tile ] |
Execute the l.inked Launcher |
|
|
Display detail |
[ click on the row ] |
Open drawer with the detail of the Connection. |
|
|
Searches connections - search engine is limited to folder / subfolder, launcher type, launcher, secret. The results are displayed in the separate tab. |
|
|
|
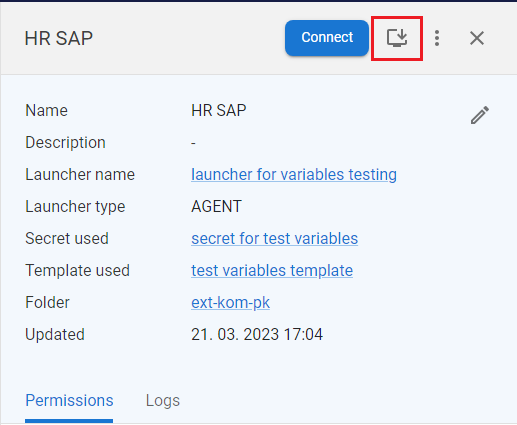
Create desktop shortcut of the connection for the direct launch |


Available actions in the detail of the Connection: |
|
|
Modify Connection |
|
|
Delete |
|
Delete Connections |
|
Mark as favourite |
|
Mark Connection as favourite - Connection will be available in the Favourites tab |
|
|
Move Connection from folder to folder |
|
|
|
Duplication of chosen Connection - create new Connection with the same name and timestamp of duplication |
|
|
Copy connection link |
|
Get the direct link for the connection and save it to the clipboard |


Available actions for Connections on the Permissions tab: |
|
[ option in context menu ] |
Open form to adjust permissions on the secret For better understanding see the example on the Permissions page. |
Available actions for Connections on the Logs tab: |
|
Open log in the full page |
[ option in context menu ] |
Open tab with brief overview of activities done with the object. By use of context menu [ |

Create Connection |
|
1 |
Click on the tab Connections to display the connections section. |
|
|
2 |
The personal root folder is opened and its content is displayed. |
|
|
3 |
Choose the folder where new Connection should be created and placed and press the button CREATE [ |
|
|
4 |
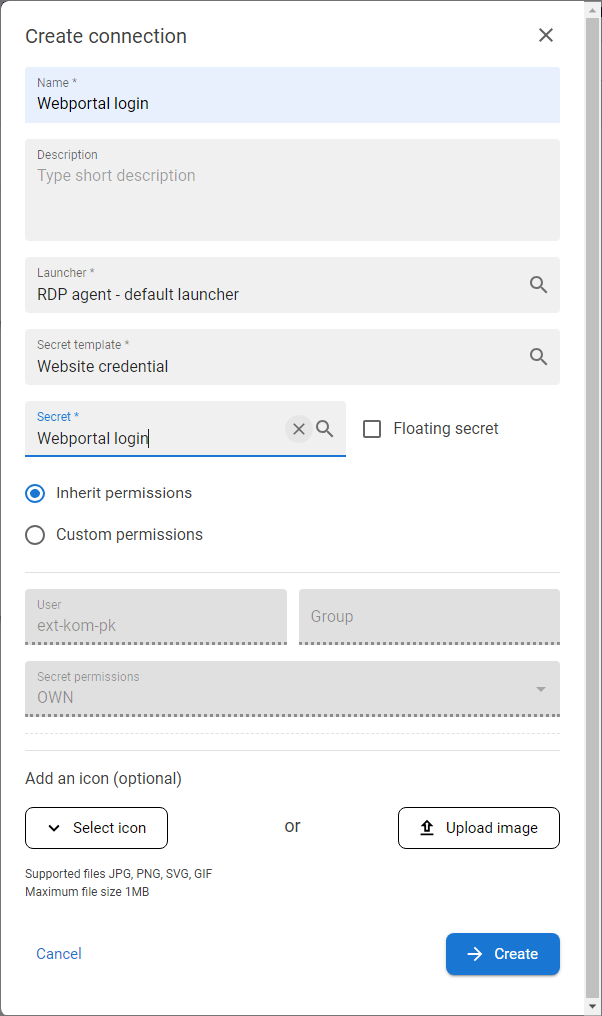
The modal window for the Connection creation will be displayed. |
|
|
5 |
Insert Name of the new secret, optionaly Description. |
|
|
6 |
Select Launcher that will be used for the connection |
|
|
7 |
Select Secret template - template binding defines the range of secrets that can be used for connection. The range of templates is defined based on the launcher mapping function - see secret templates chapter of the documentation. |
|
|
8 |
Select Secret - the list of displayed secrets is based on the chosen Secret template - credentials stored in specific Secret will be used within the run of the Connection. OR Choose Floating secret function - This feature is used, for example, if the Connection being created will serve multiple users with different credentials. By selecting a Floating secret funcion, the user's personal folder will be searched at the time the connection is started for Secrets created based on the defined secret template. The data from the found secret will then be used to run the launcher. In case the user has more than one such Secret in his personal folders, he will be asked to select a specific one during the connection launch itself. |
|
|
9 |
If there are still launcher variables that are not linked to the Secrets field, a list of them will be displayed and user can add one of the following values:
|
|
|
10 |
Select the icon or custom image to be displayed on the connection tile optionally. |
|
|
11 |
Choose whether the permissions should be inherited from the parent folder or specified custom permission and press CREATE.
|
|
|
12 |
New Connection is created and as a tile displayed in the folder. The detail of the new Connection in the drawer will be opened. |
Launch Connection |
|
1 |
Click on the tab Connections to display the Connections section. |
|
2 |
The personal root folder is opened and its content is displayed. |
|
3 |
Find the Connection to be launched and move the mouse over the tile to discover the button CONNECT [ |
|
4 |
Press the button CONNECT. |
|
5 |
If the launcher has all the necessary data for its launch, i.e. all launcher variables have been populated from the Secret or specified in the Connection creation, it will perform the launch itself. If some of the launcher variables have been defined as ASK LATER, the launcher will display a list of such fields and request the user to fill in the necessary values. Once these have been completed, the launcher is executed. |

Modify Connection |
|
1 |
Find the Connection in the folders structure and click on the tile. |
|
|
2 |
The drawer with the detail of the Connection will be opened. |
|
|
3 |
Press the EDIT button [ |
|
|
4 |
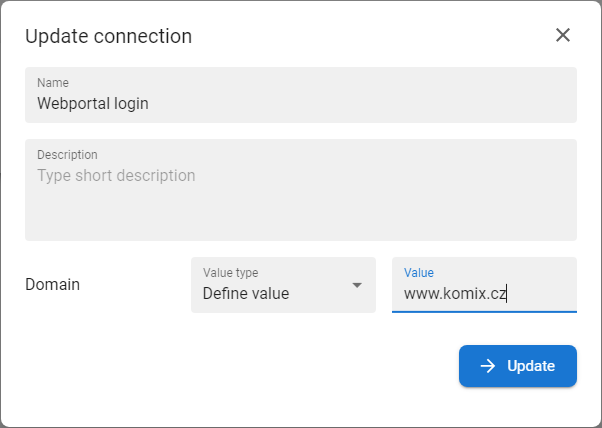
The Update Connection modal will be opened and parameters of the Connection will be available to adjust. |
|
|
5 |
Name and Description could be adjusted freely. Also all undefined variables can be adjusted. There are following options for variables:
|
|
|
6 |
Press the UPDATE button to save the changes. |

Move Connection |
|
1 |
Find the Connectiom in the folders structure and click on the tile. |
|
|
2 |
The drawer with the detail of the Connection will be opened. |
|
|
3 |
Select the MOVE CONNECTION [ Rules for moving Connections:
|
|
|
4 |
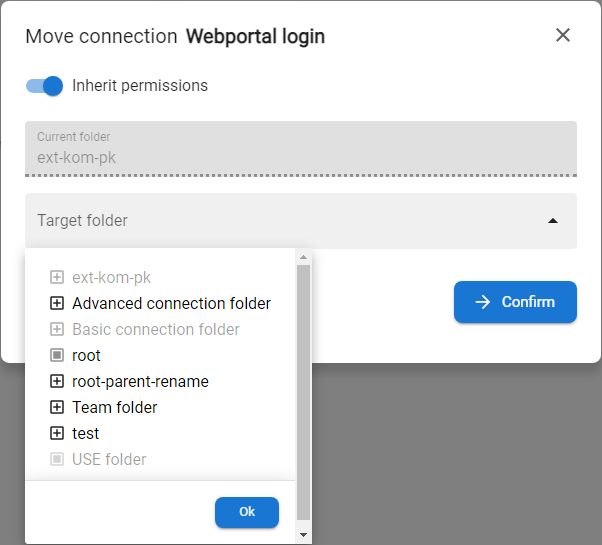
The modal window for the move Connection function is opened. |
|
|
5 |
Set whether the permissions for the Connection being moved should be inherited from the target folder, or whether the Connection should retain its current permissions. If existing permissions are to be retained, custom permissions will be saved.
|
|
|
6 |
Select the target folder from the folders list. |
|
|
7 |
Press the button CONFIRM. The moved folder will be opened and located within the target folder. |


Duplicate Connection |
|
1 |
Find the Connection in the folders structure and click on the row. |
|
|
2 |
The drawer with the detail of the Connection will be opened. |
|
|
3 |
Select the DUPLICATE CONNECTION [ Rules for duplicating Connections:
|
|
|
4 |
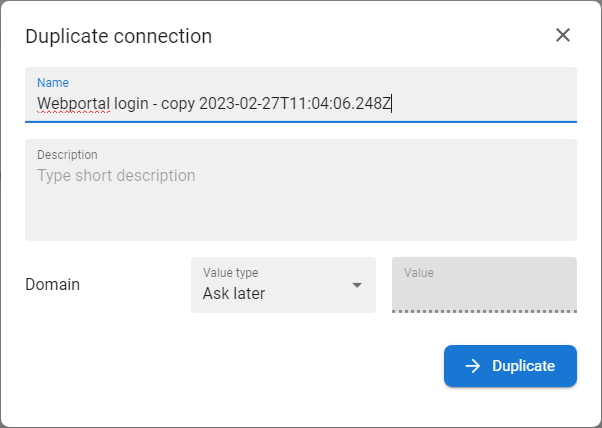
The modal window for the duplicating Connection function is opened. |
|
|
5 |
Name field will contain the name of duplicating connections with the postfix of current timestamp. This Name of the new connection could be adjusted. |
|
|
6 |
In case that Connections contains unmapped launcher variables then it could be defined within the duplication. There are following options for variables:
|
|
|
7 |
Adjust all available values and press DUPLICATE button |
|
|
8 |
Connection will be created and its detail will be opened in the drawer. |

Edit permissions |
|
1 |
Find the Connection in the folders structure and click on the row. |
|
|
2 |
The drawer with the detail of the Connnection will be opened. |
|
|
3 |
Open the tab Permission to display permissions defined on the Connection. |
|
|
4 |
Press the EDIT button [ |
|
|
5 |
New tab with the defined set of permissions will be displayed. |
|
|
6 |
User can decide whether the permissions will be inherited - get from the folder, or Custom - defined manually. |
|
|
7 |
In case that the Custom permissions should be configured switch the Custom permissions button. |
|
|
8 |
The part of the form will be activated and edited or new set of permissions could be defined. |
|
|
9 |
Search for User by username or for Group and define the permission for the Connection. List of permissions is available in the Permissions chapter. |
|
|
10 |
Press the UPDATE button to save and apply new permissions. |


Search the ANT PAM |
|
1 |
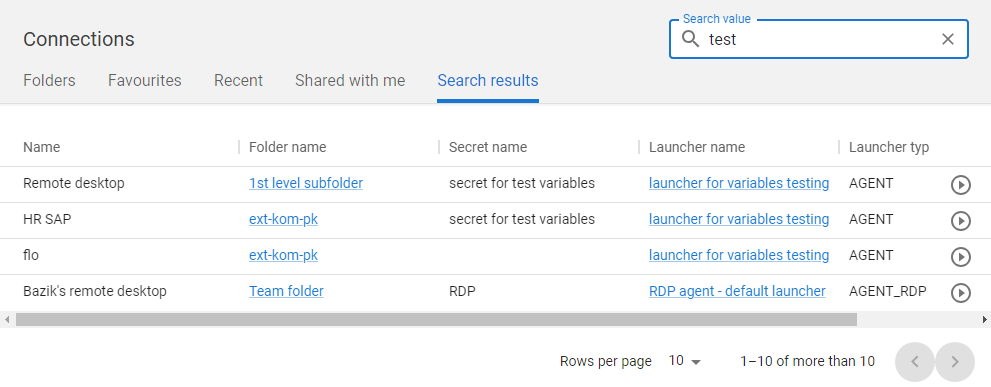
Open the Connections section of ANT PAM and fill the text into the Search value field and press enter to start search. |
|
|
2 |
The results are displayed in separate tab Search results which will appear in the tabs section. The connections can be viewed depends on the users permissions. Note: Search engine for Connections is limited to folder / subfolder, launcher type, launcher, secret |
|
|
3 |
After the reseting of the search field the Search results tab is closed. |

Create desktop shortcut |
|
1 |
Find the Connection in the folders structure and click on the row. |
|
|
2 |
The drawer with the detail of the Connection will be opened. |
|
|
3 |
Press the CREATE SHORTCUT [ |
|
|
4 |
Confirm the opening of agent application and the shortcut will be created on the desktop of the computer. The shortcut can be used for direct launch of the connection. |