Token templates
Create token templates, configure rights and cleanup token job
1. Create token templates
Admin Console / Tenant configuration / Token templates / New token template
- SMS token
- Email token
- ANT ID - OTP
- MS TOTP token
- Google HOTP token
- Hardware TOTP token
- Hardware HOTP token
- FIDO2 token
2. Create cleanup job
Admin Console / Tenant configuration / Token templates / Token cleanup job button
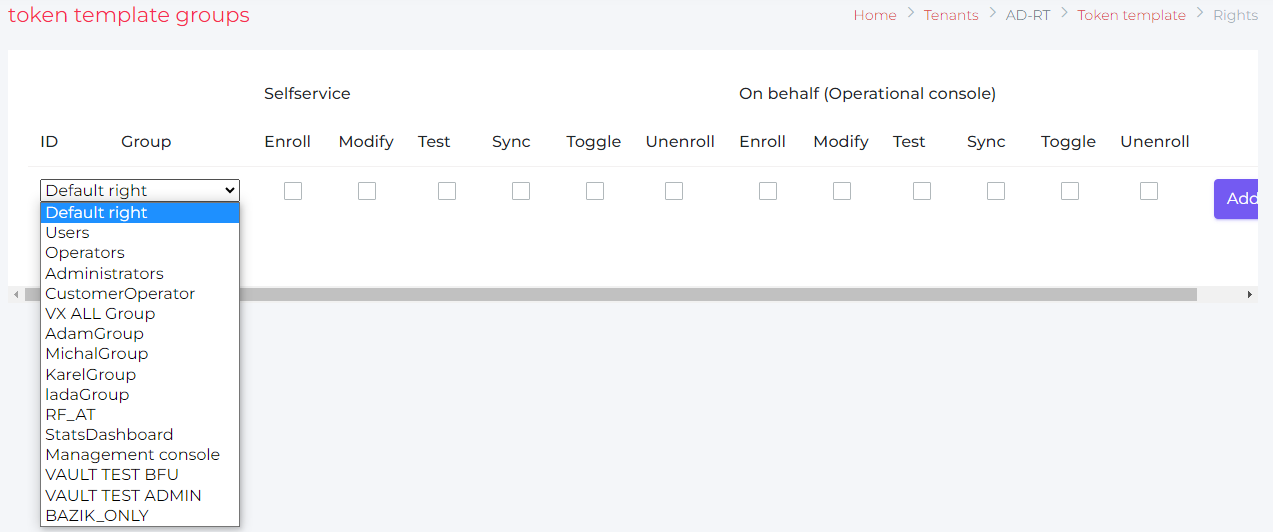
3. Configure rights for token templates
Admin Console / Tenant configuration / Token templates / Rights
The rights could be configured for specific group and specific token operation - see detail here.
SMS token
|
parameter |
description |
value |
|
Name |
|
SMS Token |
|
Token description |
text which is displayed on Selfservice within token enrollment |
e.g. Please select the mobile phone number to be used as the authentication method and press CONFIRM button |
|
Token template type |
type of the token |
SMS Token |
|
Token count per user |
how many tokens a user can register |
1 |
|
Token validity period in seconds |
how long the token is valid (null = without expiration) |
- |
|
User can delete token |
|
checked |
|
Enrollable on behalf |
the token is enrollable by operator in Operational console |
checked |
|
Notify about token expiration |
|
checked |
|
order number |
order of the token in the list |
20 |
|
user fields |
Which fields will be offered in token enrollment |
Professional mobile phone Private mobile phone (see user fields) |
Email token
|
parameter |
description |
value |
|
Name |
|
Email Token |
|
Token description |
text which is displayed on Selfservice within token enrollment |
e.g. Please select the email address to be used as the authentication method and press CONFIRM button |
|
Token template type |
type of the token |
Email Token |
|
Token count per user |
how many tokens a user can register |
1 |
|
Token validity period in seconds |
how long the token is valid (null = without expiration) |
- |
|
User can delete token |
|
checked |
|
Enrollable on behalf |
the token is enrollable by operator in Operational console |
checked |
|
Notify about token expiration |
|
checked |
|
order number |
order of the token in the list |
30 |
|
user fields |
Which fields will be offered in token enrollment |
Professional email address Private email address (see user fields) |
ANT ID - OTP
|
parameter |
description |
value |
|
Name |
|
ANT ID - OTP |
|
Token description |
text which is displayed on Selfservice within token enrollment |
e.g. Please open the ANT ID - OTP on your mobile phone and scan the QR code shown. Wait for the successful registration message in mobile phone and press the CONFIRM button. |
|
Token template type |
type of the token |
Fast Auth Token |
|
Token count per user |
how many tokens a user can register |
1..n (recommended is more than 1) |
|
User can define token label |
User can add comment within the enrollment of the token |
checked - especially when there may be multiple tokens of this type - the user must be able to name the tokens (e.g. using mobile phones where the token is enrolled - see token count per user |
|
Token validity period in seconds |
how long the token is valid (null = without expiration) |
- |
|
User can delete token |
|
checked |
|
Notify about token expiration |
|
checked |
|
order number |
order of the token in the list |
10 |
Google TOTP Token
|
parameter |
description |
value |
|
Name |
|
e.g. MS Authenticator Token |
|
Token description |
text which is displayed on Selfservice within token enrollment |
e.g. Please open the selected application for authentication methods registration on your mobile phone and scan the QR code shown. Fill in the generated OTP and press the CONFIRM button. |
|
Token template type |
type of the token |
TOTP Token |
|
Token count per user |
how many tokens a user can register |
1 |
|
User is required to provide a code from the token |
|
checked |
|
User can define token label |
User can add comment within the enrollment of the token |
checked |
|
Token validity period in seconds |
how long the token is valid (null = without expiration) |
- |
|
User can delete token |
|
checked |
|
Notify about token expiration |
|
checked |
|
Lookup ahead |
period of time which is checked within token resync |
- |
|
order number |
order of the token in the list |
40 |
|
Issuer |
Identification of token issuer on the authenticator application |
{tennant name} |
Google HOTP Token
|
parameter |
description |
value |
|
Name |
|
e.g. Google Token |
|
Token description |
text which is displayed on Selfservice within token enrollment |
e.g. Please open the selected application for authentication methods registration on your mobile phone and scan the QR code shown. Fill in the generated OTP and press the CONFIRM button. |
|
Token template type |
type of the token |
TOTP Token |
|
Token count per user |
how many tokens a user can register |
1 |
|
User is required to provide a code from the token |
|
checked |
|
User can define token label |
User can add comment within the enrollment of the token |
checked |
|
Token validity period in seconds |
how long the token is valid (null = without expiration) |
- |
|
User can delete token |
|
checked |
|
Notify about token expiration |
|
checked |
|
Lookup ahead |
number of "ticks" which is checked within token resync |
10 |
|
order number |
order of the token in the list |
50 |
|
Issuer |
Identification of token issuer on the authenticator application |
{tennant name} |
Hardware TOTP Token
|
parameter |
description |
value |
|
Name |
|
Hardware TOTP Token |
|
Token description |
text which is displayed on Selfservice within token enrollment |
e.g. Please enter the serial number of your device, generated OTPs from the device and press the CONFIRM button. |
|
Token template type |
type of the token |
Physical TOTP Token |
|
Token count per user |
how many tokens a user can register |
1 |
|
User is required to provide a code from the token |
|
checked |
|
User can define token label |
User can add comment within the enrollment of the token |
checked |
|
Token validity period in seconds |
how long the token is valid (null = without expiration) |
- |
|
User can delete token |
|
checked |
|
Enrollable on behalf |
the token is enrollable by operator in Operational console |
unchecked |
|
Notify about token expiration |
|
checked |
|
order number |
order of the token in the list |
60 |
Hardware HOTP Token
|
parameter |
description |
value |
|
Name |
|
Hardware HOTP Token |
|
Token description |
text which is displayed on Selfservice within token enrollment |
e.g. Please enter the serial number of your device, two consequently generated OTPs from the device and press the CONFIRM button. |
|
Token template type |
type of the token |
Physical HOTP Token |
|
Token count per user |
how many tokens a user can register |
1 |
|
User is required to provide a code from the token |
|
checked |
|
User can define token label |
User can add comment within the enrollment of the token |
checked |
|
Token validity period in seconds |
how long the token is valid (null = without expiration) |
- |
|
User can delete token |
|
checked |
|
Enrollable on behalf |
the token is enrollable by operator in Operational console |
checked |
|
Notify about token expiration |
|
checked |
|
Lookup ahead |
number of "ticks" which is checked within token resync |
10 |
|
order number |
order of the token in the list |
70 |
FIDO2 token
|
parameter |
description |
value |
|
Name |
|
FIDO2 token |
|
Token description |
|
Insert your FIDO2 key into the USB port and press the CONFIRM button. The application will then register the new key into the system - confirm the displayed messages and prompt you to enter a new PIN for your FIDO2 key. |
|
Token template type |
|
FIDO2 |
|
Token count per user |
|
3 |
|
User can define token label |
User can add comment within the enrollment of the token |
checked |
|
Relying party Name (Token / tenant identification) |
|
rt.preprod.vx.your-iam.com |
|
Relying party ID (The id must be a subset of the domain) |
|
your-iam.com |
|
User domain (will be add to username to recognized FIDO users from different tenants. '@' will added automatically): |
|
rt-preprod |
|
Fido2 attestation: |
|
DIRECT |
|
Fido2 user authentication: |
|
REQUIRED |
|
Allowed Origins |
list of origins where fido2 should work as a second factor links for specific tenants and environments |
|
|
Allow origin Subdomain (if validation should be relaxed on subdomain of defined origins) |
|
checked |
|
Allow origin ports |
|
|
|
Allow only token which can be used for usernamen-less authentication |
|
checked |
|
timeout |
|
60000 |
|
Token validity period in seconds |
|
|
|
Notify about token expiration |
|
|
|
Order number |
|
|
2. Create token clean job
Admin Console / Tenant configuration / Token templates / Token clean up job
|
parameter |
description |
value |
|
before subject setup |
email header text notifying of token expiration - before expiration |
language: en text: Token ${tokenTemplateName} ${serialNumber} will expire in ${expirationDays} |
|
after subject setup |
email header text notifying of token expiration - after expiration |
language: en text: Token ${tokenTemplateName} ${serialNumber} has expired |
|
before text setup |
the text of the email notifying the expiry of the token - before expiration |
language: en text: Dear ${firstName}, your token ${tokenTemplateName} (${serialNumber}) will expire in ${expirationDays} day(s). Token label: ${tokenLabel} Assigned to user: ${username} - ${firstName} ${lastName} Enroll a new one here: https://selfservice-vx-test.komix.local/selfservice/tokenmanagment If you only have one token, you'll have trouble logging in after: ${expirationDateTime} Your ANT ID, your-iam.com |
|
after text setup |
the text of the email notifying the expiry of the token - after expiration |
language: en text: Dear ${firstName}, your token ${tokenTemplateName} (${serialNumber}) has expired. Token label: ${tokenLabel} Assign to user: ${username} - ${firstName} ${lastName} In case you had only one token contact support to get access to the selfservice. Your ANT ID, your-iam.com |
|
Sender |
|
{tennant name}@your-iam.com |
|
Days before expiration |
|
10,5,3,2,1 |
|
Time (format: HH:mm) |
|
HH:MM |
|
User fields |
|
Professional Email Address Private Email Address |
3. Configure rights
Admin Console / Tenant configuration / Token templates / Rights
For each token is possible to define set of permissions for specific groups:
- select token template and press the Right button:
- select the group or define Default right
- check the specific operations which will be allowed for the operation from Selfservice and for operations from operational console (by operators)
- press Add button.
Allowed operations will be marked as [  ] whil forbidden operations will be marked as [
  ].
].
The RIGHTS means that users from specific groups (or anybody with the Default configuration) will be able to do only allowed operations.